
Here’s the continuation and completion of your blog post:
Step 2: Add the Eggs
Add the eggs one at a time, mixing thoroughly after each addition.
At first, the dough may appear separated or lumpy, but continue mixing. After the final egg is incorporated, the dough should become smooth, glossy, and thick enough to slowly fall from a spoon in a V-shaped ribbon.
This consistency is essential for creating cream puffs that rise beautifully and develop their signature hollow centers.
Transfer the dough to a piping bag fitted with a large round tip, or simply use two spoons.
Pipe or scoop mounds approximately 1½ inches wide onto the prepared baking sheets, leaving space between each puff for expansion.
If desired, lightly dampen your fingertip with water and smooth any pointed peaks on top of the dough.
Step 3: Bake the Cream Puffs
Place the baking sheets in the preheated oven.
Bake at 425°F (220°C) for 10 minutes.
Without opening the oven door, reduce the temperature to 375°F (190°C) and continue baking for 20 to 25 minutes, or until the cream puffs are deeply golden brown and feel light when lifted.
The shells should appear crisp and dry.
Once baked, remove the trays from the oven.
Using a small knife or skewer, carefully pierce a small hole in the side of each puff.
This allows steam to escape and prevents the pastries from becoming soggy.
Transfer the cream puffs to a wire rack and allow them to cool completely.
Step 4: Prepare the Vanilla Custard Filling
While the pastry shells cool, prepare the creamy vanilla custard.
In a medium saucepan, heat the milk over medium heat until steaming but not boiling.
Meanwhile, whisk together the egg yolks, sugar, cornstarch, and salt in a separate bowl until smooth and pale.
Slowly pour a small amount of the hot milk into the egg mixture while whisking constantly.
This process, known as tempering, prevents the eggs from scrambling.
Gradually whisk in the remaining milk.
Return the mixture to the saucepan and cook over medium heat.
Whisk continuously until the custard thickens and begins to bubble gently.
Once thick and silky, remove from the heat.
Stir in the vanilla extract.
Transfer the custard to a bowl and cover the surface directly with plastic wrap to prevent a skin from forming.
Allow the custard to cool completely before refrigerating for at least one hour.
Step 5: Fill the Cream Puffs
Once both the custard and shells are fully cooled, it’s time to assemble.
Fill a piping bag fitted with a small round tip with the chilled vanilla custard.
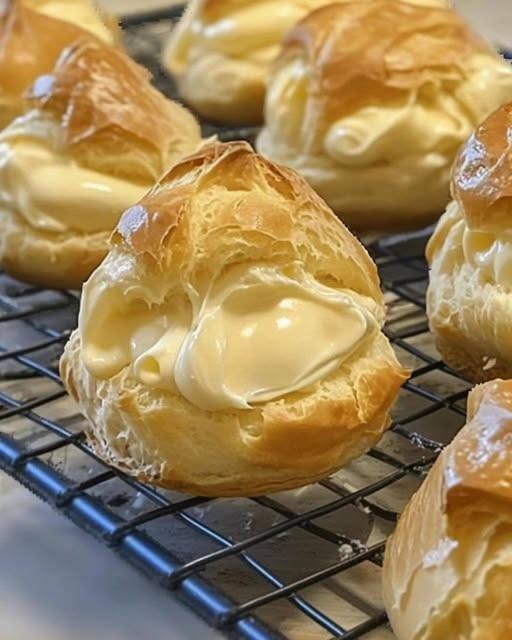
Insert the tip into the hole previously made in each cream puff and gently pipe the filling inside until the shell feels slightly heavy.
Avoid overfilling, as excessive custard can cause the shells to soften too quickly.
Alternatively, slice each cream puff in half horizontally and spoon or pipe the filling inside before replacing the top.
Step 6: Add the Finishing Touch
For a classic bakery-style presentation, dust the tops generously with powdered sugar.
You may also drizzle them with melted chocolate, caramel sauce, or a simple vanilla glaze.
Fresh berries make a beautiful garnish and pair wonderfully with the creamy filling.
Serve immediately for the best texture and flavor.
Delicious Variations
One of the reasons cream puffs remain so beloved is their versatility.
Chocolate Cream Puffs
Add melted dark chocolate to the custard filling for a rich chocolate version.
Whipped Cream Filling
Replace the custard with sweetened whipped cream for a lighter dessert.
Coffee Cream Puffs
Add a teaspoon of instant espresso powder to the custard for a subtle coffee flavor.
Fruit-Filled Cream Puffs
Fold fresh strawberries, raspberries, or blueberries into the custard before filling.
Chocolate-Dipped Cream Puffs
Dip the tops in melted chocolate and allow them to set before serving.
Storage Tips
Filled cream puffs are best enjoyed the same day but can be stored in the refrigerator for up to two days.
Store unfilled shells in an airtight container at room temperature for one day or freeze for up to two months.
The custard can be prepared up to two days in advance and refrigerated until needed.
Why Homemade Cream Puffs Taste Better
Store-bought pastries often sit for hours before serving, causing the shells to lose their crispness.
Homemade cream puffs offer a contrast that’s difficult to beat:
Crisp, golden exterior
Light, airy center
Fresh vanilla custard
Perfect sweetness
Bakery-quality texture
Every bite combines delicate pastry and silky filling in a way that feels both luxurious and comforting.
Frequently Asked Questions
Why Did My Cream Puffs Collapse?
Usually because they were underbaked or the oven door was opened too early during baking.
Can I Freeze Cream Puffs?
Yes. Freeze the baked shells without filling. Thaw and fill before serving.
Can I Make Them Ahead?
Absolutely. Prepare the shells and custard separately, then assemble shortly before serving.
Do I Need a Stand Mixer?
No. A wooden spoon and some patience are all you need.
Final Thoughts
Cream puffs may seem like an advanced pastry, but they are surprisingly accessible for home bakers. With just a handful of everyday ingredients and a little attention to detail, you can create elegant pastries that rival those found in a French bakery.
The combination of crisp choux pastry and smooth vanilla custard is timeless for a reason. Whether served at a family gathering, holiday celebration, afternoon tea, or simply as a weekend treat, these homemade cream puffs never fail to impress.
Once you master this classic recipe, you’ll find yourself returning to it again and again. One bite of the light pastry and creamy filling is enough to understand why cream puffs have remained a beloved dessert for generations.
This version is optimized for recipe blogs, readability, and search traffic while keeping readers engaged through the entire recipe.
ADVERTISEMENT

